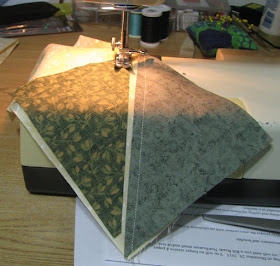
Thanks to the commissioned t-shirt quilt I've got lots of 2.5 inch strip sets left over from the binding and sashing in the quilt (pieces and full width-of-fabricsets). And I've a hard time tossing out stuff that is usable....might be why I have so many scraps...lol. the strips sets, when sub-cut and resewn make 2.5 inch four-patches.
At any rate, I started thinking about what I could do with all the 4-patches that I could make from the leftover pieces. At the same time I'm still trying to use up some of the abundance of scraps that I have and currently have two bags on the kitchen counter where my cutting mat is- blacks and assorted solids.
So this morning I quickly made a few 4 patches and then bordered them with some of the brighter solids in the scrap bag. Trimmed the resulting blocks to 5.5 inches and laid them out with some of the larger black pieces to see how they looked. First layout is below.
Another possible layout is below. Haven't decided which one I want to make.....or how many blocks I want to piece. I know I could make more 4-patches than I have brighter/lighter scraps so I may end up cutting strips from some of my remnants to finish this quilt when I finally decide on a layout.
Which layout do you like?
Gratitudes:
1. Living in town with only a mile to drive to work when storms like the one today are in the area.
2. Good health insurance as more treatments and tests pile up.
My Pages
▼
Wednesday, March 30, 2016
Sunday, March 27, 2016
Triangle Challenge Quilt
Saw a challenge that designer, Pat Sloan, had posted at this link, and couldn't resist making a quilt to enter the challenge.
As it happened I had half of the half-square triangles (HST's) needed to make the challenge block already made and trimmed to size. The center block was also already complete and waiting for a project that called for it. All of the fabrics and HST's were made from the scraps of a prior project.
The blocks made for this challenge are the ones around the outside of the quilt and the quilt that inspired this one is the Boden Quilt that Pat Sloan designed.
Finished size at this point is 40" square. I haven't decided on whether to put one more border on the quilt or not...And if I do add one, do I make it solid or checkerboard or something else? At this point I think I'll leave it as is. It is definitely large enough for a baby quilt, although not quite traditional colors for one. Would also work for a small lap quilt.
Gratitudes:
1. Am feeling much better today. Thankful for small favors.
2. The weather outside is beautiful, even if a bit windy.
Saturday, March 26, 2016
Half-Square Triangle Blocks - A Tutorial
A lot of the scraps that I've accumulated are either triangles or easily adaptable to triangles and therefore easily used for Half-Square Triangle blocks. To make HST's easier and faster to make, I adapted instructions that I'd seen somewhere on the internet a year or more ago for the way I work.
One note before I go into the steps here - I make my HST's oversized and then trim to the size that I need for whatever project I'm working on at the time. Or if I'm just using scraps up in order to have parts made in advance of a particular project then I'll trim the HST's to the largest size that I can out of the sewn block, typically that means 4.5", 3.5" or 2.5" as a finished size.
So having said that, here are the steps that I use for making HST's -
Step 1 -
Roughly cut triangles of your scrap fabrics. Then cut oversized lengths of your background fabric. For me I'll rough cut the background fabric at least an inch larger than the finished HST will be. So if I need 3.5" HST's then I'll cut the background fabric at 4.5" wide by at least that amount or whatever the length/width of the fabric that I'm cutting it from is.
Step 2 -
Lay one triangle face right side down to the right side of the background fabric. Stitch the diagonal seam across both pieces.
Step 3 -
Turning the next triangle so that it faces the opposite direction of the first, sew the diagonal seam.
Step 4:
Cut the sewn pairs apart.
Step 5:
Lay your ruler down on top of the first pair. Line the finished size that you want the HST to be along the seam line. In the picture below, I've lined up my ruler at 3.5" on both sides, this will give me a finished 3.5" HST. Continue till you have all of your HST's trimmed to size.
Press blocks open and have fun making your project!
One note before I go into the steps here - I make my HST's oversized and then trim to the size that I need for whatever project I'm working on at the time. Or if I'm just using scraps up in order to have parts made in advance of a particular project then I'll trim the HST's to the largest size that I can out of the sewn block, typically that means 4.5", 3.5" or 2.5" as a finished size.
So having said that, here are the steps that I use for making HST's -
Step 1 -
Roughly cut triangles of your scrap fabrics. Then cut oversized lengths of your background fabric. For me I'll rough cut the background fabric at least an inch larger than the finished HST will be. So if I need 3.5" HST's then I'll cut the background fabric at 4.5" wide by at least that amount or whatever the length/width of the fabric that I'm cutting it from is.
Step 2 -
Lay one triangle face right side down to the right side of the background fabric. Stitch the diagonal seam across both pieces.
Step 3 -
Turning the next triangle so that it faces the opposite direction of the first, sew the diagonal seam.
Step 4:
Cut the sewn pairs apart.
Step 5:
Lay your ruler down on top of the first pair. Line the finished size that you want the HST to be along the seam line. In the picture below, I've lined up my ruler at 3.5" on both sides, this will give me a finished 3.5" HST. Continue till you have all of your HST's trimmed to size.
Step 6:
Press blocks open and have fun making your project!
Gratitudes:
- Spring Break is here. =)
- Travel was safe to and from the latest chemo appt. A real blessing given how drowsy I was from the double dosage of benadryl.
Sunday, March 20, 2016
National Quilt Day/Weekend Sewing
Been busy sewing and quilting this weekend.
One of the biggest things accomplished this weekend is that I finished the quilting of the T-Shirt quilt! Even managed to fight through getting the middle three blocks quilted on my little Kenmore. Had intended to do them on the midarm...but in ordering the replacement bobbin case I forgot that the bobbins for the critter are in the same place as the missing bobbin case and didn't order them. Oops, still need to do that because I've got a couple of other quilts that need to be quilted and I may try to do them on the mid-arm. Will get the binding done and on the first part of this week so that I can work on hand-stitching it down this week when I'll be in Casper for 2 days of doctor/chemo stuff and then down in Cheyenne for errands there. Also on the plate for the same commission are the remaining four t-shirt pillows that need to be done for my customer. Tops are in progress on those and thankfully won't take long to finish up.
I also put together the novelty beach ball blocks into a top. And then got the first border on it. Now I'm trying to decide what color to use for the final border. With all of the prints in the balls, I really want to use a solid or a tone-on-tone. Just not sure what color, Any ideas for me?
The instructions for the block can be found in this post.
During this last chemo session I finished up this little cross-stitch kit that I've had for several years. It will be going into a quilted postcard and eventually end up being sent to one of my friends.
And of course I end up thinking about new projects. These are little sayings that quilters would like. I'm debating about putting them into quilted postcards or into mug rugs for sale or for gifts. =)
Other projects for spring break that are coming into being include the three leather knife sheaths, more scrub tops to be made so I can send a shipment off and possibly getting the next couple of quilts basted so I can get to work on quilting them.
Gratitudes:
1. Spring Break is this week....woohoo.........
2. Halfway through chemo, only 2 more rounds to go at this point. Now if only my platelets would get the message and start behaving.
Thursday, March 17, 2016
Beach Ball Block Tutorial
Measurements and instructions for this project are given for a single block because this project is aimed at using those larger scraps of big novelty print fabrics that are so hard to work with. However, having said that, any fabric will work for the block, so have fun with it!
Finished block size - 9.5" square (10" unfinished)
Materials needed for one block:
Novelty print -
2 pieces 4.5" by 10"
Coordinating fabric -
1 piece 2.5" by 10"
Background fabric -
4 - 2.5" squares
Note: I used my scraps the size they were after making sure I had a straight edge on them for seams. And then trimmed them to the final size.
Step 1: Sew the coordinating color between the two pieces of your novelty print. Press the seams in the direction that you want them to go. (I pressed them towards the coordinating color.)
Step 2: If needed square your blocks to 10" square in size.
Step 3: Place the 4 background fabric squares on the corners of your block. Sew from corner to corner (side to adjacent side) across the background fabric. Trim to a 1/4 seam.
Step 4: Press seam in the desired direction.
Step 5: Once you have all the blocks you want made, then lay them out in the desired pattern and sew your quilt top together. Finish as desired!
A possible layout will be coming in the next couple of days....but first I have to actually get the corners on my remaining blocks! That might take a day or two because I'm off to Casper for the second chemo treatment this evening (treatment is tomorrow morning) and I'm definitely not bouncing back from them as easily as I did yrs ago.....the joys of getting older.
Gratitudes:
1. Spring break is next week - I'll have the time to get some of this commissioned sewing finished up and off to where it should be. =)
2. Got my first paycheck for the PT job - woohoo...........
Monday, March 14, 2016
More Novelty Scrappy Fun.....
I've still got more novelty print scraps leftover from the swatch sets, enough for at least 2 more quilt tops and that's after getting blocks for 3 complete tops so far.
I am getting down on size though, and what I'm working with at this point are about the width of a FQ in length and 5" in width. In an attempt to use all that I can of the fabrics, and pairing them with scraps or other pieces that I already have cut in squares I will be making up these striped "Beach Ball" blocks.
Unfinished they are 10" in size and will finish out to 9.5". I've enough for at least 20-22 blocks, and with sashing that will make a respectable sized kids quilt for donation.
Any interest in a quick tutorial for this block?
Gratitudes:
1. Side effects of chemo, while irritating, are so much less than some people fight.
2. I was able to figure out a solution for the t-shirt quilt where I'm working with 2 different color shirts on either side.....now to frog-stitch one block so I can redo and have it look like I want it to.
Sunday, March 13, 2016
Distractions Happen....
I should have been getting something to eat so that I can go do laundry and then head over to quilt the 12 blocks that are pinned on the t-shirt quilt.........but distractions happen around here. And if not doing that I should have been working on the t-shirt pillows.....but without the border fabrics out and accessible....distractions happen. And it's not like there aren't other commissioned items that need to be worked on....patterns to make for knife sheaths, scrub tops to sew, quilts to baste, and proof-reading to do.....but distractions happen.
And when distractions happen a new project grabs my attention.....yes, I'm easily distracted. Today's distraction started with remembering that I'd pulled some scraps of poppy fabric to put in a box of stuff for a quilting buddy.....and wondering if they'd go with this long-ago finished cross-stitch piece that I'd never done anything with. A quick hunt through the batik FQ's found this green that worked with both pieces. Remaining poppy fabric with a little more of the green batik and I had the backing pieced for the snack mat. It's all quilted now, but I need to decide what to bind it in. Don't have enough of the FQ left to use that, so the decision will have to wait till I have time for it or till I'm distracted again.
And yes, distractions a-plenty abound around here.....I've got about 18 or so more cross-stitch pieces this size pulled for mug rugs or snack mats...I really need blinders on to stay focused...lol.
Gratitudes:
1. Spring like weather is here in Wyoming. =)
2. Scraps, scraps and more scraps to have fun with.
Saturday, March 12, 2016
Novelty H's - A tutorial
I'm still working on using up what I had thought were just a few novelty scraps.....three quilt tops later I still have oodles left to work with. This quilt finishes out at 44" wide by 58" long. And other than the sashing which was made from two different remnants of WOW fabric, was made from all scraps.
Because I used scraps for this quilt, and that's what I've designed it to use, I will be giving fabric amounts for a single block, and then seperately for the sashing and cornerstones.
Fabric Requirements for the blocks -
Novelty print - 2 pieces cut 5.5" by 12.5"
WOW - 2 pieces cut 2.5" by 5.5"
Coordinate - 1 piece cut 2.5" by 2.5"
Note: If you are using novelty prints with a one way design be careful on how they are cut and then laid out in the quilt, otherwise you'll have things that are upside down.
Sashing and cornerstones -
Assorted colors - 16 cornerstones cut 2.5" by 2.5"
Sashing - 31 strips cut 2.5" by 12.5"
To Assemble the blocks -
1. Sew a WOW section to each side of the coordinating square
2. Sew a novelty print square to each side of the resulting strip made in step 1
3. Press seams flat
To Assemble Quilt -
1. Sew 5 sashing strips, alternating cornerstone squares and sashing strips
2. Sew the rows together alternating sashing strips and blocks
3. Sew the sashing strips and block rows together, ending with a final row of sashing
Gratitudes:
1. First round of chemo went well with no real side effects
2. Insurance approved the treatments, now trusting that most, if not all of the cost will be covered as well.
Friday, March 11, 2016
Voting for February Design Entry
Voting has started for this months block designs in the Modern Quilts Unlimited block design contest. Designs were to be based off of the Rail Fence block.
Mine can be seen and voted for at this link .
You'll need to be logged into a FB account to vote.
Thanks in advance for any votes you might make.
Gratitudes:
1. Drive to/from Casper was a good one.
2. First round of chemo went ok.
Mine can be seen and voted for at this link .
You'll need to be logged into a FB account to vote.
Thanks in advance for any votes you might make.
Gratitudes:
2. First round of chemo went ok.
Thursday, March 10, 2016
Scraps, scraps and more scraps
I'm still working on the novelty print scraps. Same originating "stash" of them for these blocks, just width of fabric or FQ depending on what I started with. This pile runs from about 5.75" to 6" in length.
Finished blocks are 12" in size. All fabrics in them are from my various scrap bins. Fun in using them comes in from trying to remember that directional prints need to have both sides facing in the same direction. I'm currently planning on making 12 blocks and then setting them with sashing. When the top is finished it'll be donated to Sunshine Quilts.
Inspiration for block came from a picture I'd found on the internet several years ago and I have no clue where I found it now. Block is super fast to make which makes me happy.
Any interest in my writing a quick tutorial for the finished quilt?
Gratitudes:
1. God's provision of a place to stay for the night for freen as I head to Casper for the first round of Chemo.
2. All the friends in my life that I've been blessed with.
Tuesday, March 8, 2016
Sketching New Block Designs and Settings
The Modern Quilts Unlimited monthly block design contest is more than halfway done. I still need to design and make the block for September when I was moving. The traditional block was the Ohio Star and I've had ideas, but nothing that has really gelled for a design. I've got a bunch of little pieces left from the block I'm currently working on so I may see about coming up with a design that will use those or some of my other small scraps left over from prior blocks.
I'm also starting to work on designing the setting for the blocks so that I can start putting the quilt top together. Have been working with pieced borders, but that isn't working.
In the back of my mind has been a border that would have to be appliqued....guess I'm going to need to start sketching to see if I can get this to work out the way I'm thinking. Now where have I "hid" my graph paper so I can start taping pages together to get it big enough....hmmmmmm.
Gratitudes:
1. For the medical insurance that I have and all that it pays for as I prepare for 4 rounds of chemo as we work to control the platelet count.
2. For all the work that my coworker (a nurse and dietician) is putting into helping me get my diet under control and hopefully help improve my health.
Monday, March 7, 2016
Half done.......
.....with my block for the block design contest. That's 96 pieces of fabric sewn together in two 6" finished blocks. Some of which are about the size of a quarter The background_!
There are six pp'd strips in each block and each one takes about six minutes to make. Adding the time it takes to sew them together and then remove the paper, each block quarter takes about an hr to make. Could be a lot worse!
I am loving how the block is looking with the replacement fabric that I found for it this past weekend.
Next up is working on the setting for the final quilt. I've sketched out some ideas, but haven't made up my mind yet. Still have one or two in my head that I'm trying to figure how how I can get them done.....might have to applique the sashings if that is the design I decide to do instead of piecing the sashing. Or maybe make a combination of the two.
Gratitudes:
1. Kids were good for the sub while I was out last week for the medical appointments
2. There is another treatment to try to stabilize my platelets.
Sunday, March 6, 2016
Progress with scraps and in other areas
Finished using up the remaining small pieces of novelty prints in a second scrappy top. Finished quilt ended up at 36" by 60", just a few inches shy of the 40" width I was aiming for. But it is what it is. This will be heading off to Sunshine Quilts at some point.
All of the fabrics in the quilt are from my scraps - the novelty prints are the remainder of the ones I had started to use in this quilt. The blacks were all leftover fabrics from the many commissioned scrub tops that I've done over the last few years. The purple w/black cats was what I had left from making a scrub top.
And in other news, this last week I was able to pay off the next bill thanks to getting my Federal tax return back. And even better, it was paid off 2 months before the promo 0% interest rate ran out - woohoo. Now onto the next bill to get it paid down and off. Ond more flower has now be colored in and finished. Looking forward to the next one getting colored in.
Made a trip around the state for errands and for doc appts this weekend......more trips coming up as I will be back in Casper for chemo as we try to get my platelets under control and stable. At lesat tho there is a really nice quilt store there should I need anymore fabric. =)
Gratitudes:
1. That there are still things that can be tried to get the platelets stable
2. That I have the stash I do - it's so much fun to work with the scraps and see something fun come out of them.
Thursday, March 3, 2016
Completed Quilt Top and a Short Tutorial
Finished the quilt I've been working on using the scraps of novelty print fabrics. I figure these scraps cost as much as the yardage did so I wasn't going to waste more of them than I had to. =)
To make the quilt I followed the following basic steps:
First --
I took the novelty print scraps that I had left over after cutting swatch sets from over 100 different fabrics. These were all 6.5" tall, but different widths. I then trimmed them into the largest rectangles that I could get out of the fabrics. Sizes ranged from 2" wide to approximately 4.5" wide.
Second --
I pulled out a bag of solid black scraps and started cutting 2.5" by 6.5" strips to use between the novelty print fabrics.
Third --
I sewed pairs of black rectangle and a novelty print together. Then sewed them together to form the rows. In making the rows I estimated the size at roughly 36" and played with how the novelties and the black laid out to get a random look. Seams were all pressed the same direction for all of the rows. You'll need to watch the direction your fabrics layout if they are directional prints in this step.
Fourth --
Once the rows were together, I alternated the pieced rows with 2" cut rows of black solid fabric (also from the scrap bag). until the center was about 50" or so long. The Solid black rows begin and end the center.
Fifth --
I added 5" cut borders to both ends of the quilt. Make sure if you are using a directional print that both ends are going in the direction.
Sixth --
I added a 2.5" border around the outside of the quilt for the final border.
Final size of this quilt is approximately 42" wide by 66" long.
This is a quilt that you can customize to whatever size scraps that you want to use in it. The pieced rows don't even have to be the same height as each other.
Gratitudes:
1. Good weather is forecast for today as I head to Casper for doc appts today and tomorrow.
2. Finished off my first two projects for the PT proof-reading job.
Wednesday, March 2, 2016
Continuing on......
Two more sections pieced for this test section on the contest entry block, which may turn out to be my entry if I can't find a darker shade to use this weekend when I hit the quilt shops in Casper and Cheyenne.
I like everything about it except the lightness of the top row..........ah well, I may have to learn to like that....lol.
Piecing has been easy. Sewing the columns together a bit more fiddly than hard in order to keep everything lined up correctly. Nice though to see the idea I had for this one coming to fruition.
Gratitudes:
1. Tax return is in the bank account and I've been able to pay off the next credit card!
2. I have a short week at school (albeit for 3 doc appt's) to get errands done in the "big cities" of Wyoming this weekend and the weather is supposed to be good. =)
Tuesday, March 1, 2016
Inspiration and certifiable......
The February traditional block chosen by Modern Quilts Unlimited for the contest this month was the rail fence. A very simple, and often times uninspiring block choice for me. As it happens though, I had been searching the internet for inspiration for a project that I can't even remember what it was now. (Ever have one of those days?) The inspiration photo that I found was one of the airport tower for the Harare International Airport in Zimbabwe Africa.
I loved the overlapping rows of triangles and inset windows. Took me a few days to figure out how to sketch it and then piece it. But once that happened I was able to get my pattern drawn up. Unlike some months blocks the color choice just flowed this month and fell into place. That might be because I'd been trying to use these colors for several months now and they just hadn't felt right in any of the blocks. I'm loving them though in this one. =)
The block pattern has 48 individual pieces of fabric in each 6" section of the final 12" finished block. That makes for a total of 192 pieces in the final block. And yes, the background pieces are about the size of a quarter. Easy sewing, but time consuming - I may be certifiable by the time I'm through...LOL....
Have made two strips and the only thing I'm debating about now is if the fabric at the bottom is too light for the right kind of color progression. I'll be out of town this weekend and will be stopping by a couple of new-to-me quilt stores, so I'll check to see if they have anything that might fit better before going on with the piecing.
Gratitudes:
1. For all the blessings of marked down food that God has provided lately. Lots of good eats in it.
2. For the blessing of the part-time job that is interesting and takes me back to the days of my undergrad degrees in electronics and past work experience in QA as i get ready to submit my first timesheet. =)